
When building Hotkey Typer, a Windows Forms app that types predefined snippets via hotkey, I discovered the power of GitHub Copilot's new custom agents feature. What started as a simple refactoring request turned into an eye-opening demonstration of how specialized AI agents can dramatically improve code quality and implementation speed.
What Are Custom Agents?
Custom agents are specialized versions of GitHub Copilot coding agent that you can tailor to your unique workflows, coding conventions, and use cases. Instead of repeatedly providing the same instructions and context, custom agents allow you to define specialized agents that act like tailored teammates—following your standards, using the right tools, and implementing team-specific practices.
Think of custom agents as expert consultants embedded directly in your development workflow. They're defined using simple Markdown files (called agent profiles) that specify:
- Name and description: What the agent specializes in
- Custom prompts: Detailed instructions that define the agent's behavior and expertise
- Tools: Specific tools the agent can access (optional)
- MCP servers: Model Context Protocol server configurations for enhancing agents
Where You Can Use Custom Agents
Once created, custom agents are available wherever you use Copilot coding agent:
- GitHub.com: In the agents tab, panels, issue assignments, and pull requests
- Visual Studio Code: As chat modes in the editor
- GitHub Copilot CLI: Command-line interactions
Each interaction maintains consistency based on the agent's defined profile, ensuring targeted support tailored to your specific needs.

Where to Configure Custom Agents
You can define agent profiles at different levels:
- Repository level: Place
.mdfiles in.github/agents/for project-specific agents - Organization level: For broader team availability
- Enterprise level: For company-wide standardization
The agent profile format is straightforward:
---
name: readme-creator
description: Agent specializing in creating and improving README files
---

You are a documentation specialist focused on README files. Your scope is limited to
README files or other related documentation files only - do not modify or analyze code files.

Focus on the following instructions:
- Create and update README.md files with clear project descriptions
- Structure README sections logically: overview, installation, usage, contributing
- Write scannable content with proper headings and formatting
- Add appropriate badges, links, and navigation elements
Discovering the WinForms Expert Agent
The real power of custom agents became apparent when I discovered the awesome-copilot repository, a curated collection of custom agents maintained by GitHub. This repository contains specialized agents for various frameworks and technologies, including C#, WinForms, arm Migration, Dynatrace, LaunchDarkly, Neon, PagerDuty, and more!
Among these gems, I found the WinForms Expert agent—a sophisticated agent specifically designed for .NET Windows Forms development. This agent encodes decades of WinForms best practices into a single, reusable profile.
What Makes the WinForms Expert Special?
The WinForms Expert agent is a comprehensive guide that understands the nuanced challenges of WinForms development. It addresses several critical areas:
Designer Code vs. Regular Code: One of WinForms' unique challenges is managing two distinct code contexts—designer-generated serialization code and modern business logic. The agent knows exactly which C# features are allowed in each context.
Modern .NET Patterns: The agent is fully updated for .NET 8-10, including:
- MVVM data binding patterns with the Community Toolkit
- Async/await patterns with proper
InvokeAsyncoverload selection - DarkMode support and high-DPI awareness
- Nullable reference types (NRTs) in the right places
Layout Best Practices: Comprehensive guidance on using TableLayoutPanel and FlowLayoutPanel for responsive, DPI-aware layouts that work across different screen sizes and scaling factors.
CodeDOM Serialization Management: Critical rules for property serialization in the WinForms designer, preventing common pitfalls with [DefaultValue] attributes and ShouldSerialize*() methods.
Exception Handling: Proper patterns for async event handlers and application-level exception handling to prevent process crashes.
The agent's instructions are remarkably detailed, covering everything from control naming conventions to accessibility requirements. It's like having a senior WinForms architect reviewing every line of code.
Adding the WinForms Expert to My Repository
Adding a custom agent from the awesome-copilot repository is remarkably simple:
- Create the
.github/agents/directory in your repository - Copy the agent profile (a
.mdfile) into this directory - Commit and push—that's it!
For Hotkey Typer, I copied the WinFormsExpert.agent.md file into .github/agents/, making it immediately available to Copilot throughout my repository.
The Real-World Test: Multiple Snippets Feature
I had opened Issue #3 requesting a new feature: support for managing multiple reusable text snippets instead of just a single predefined block. Users needed to switch between different prompts, code templates, and demo scripts quickly without manual settings editing.
The feature requirements included:
- Maintain a list of snippets with names and content
- Select active snippet from a dropdown in the main UI
- New/Copy/Rename/Delete operations with validation
- Backward-compatible migration from the old single-text format
- Persist everything in
settings.json
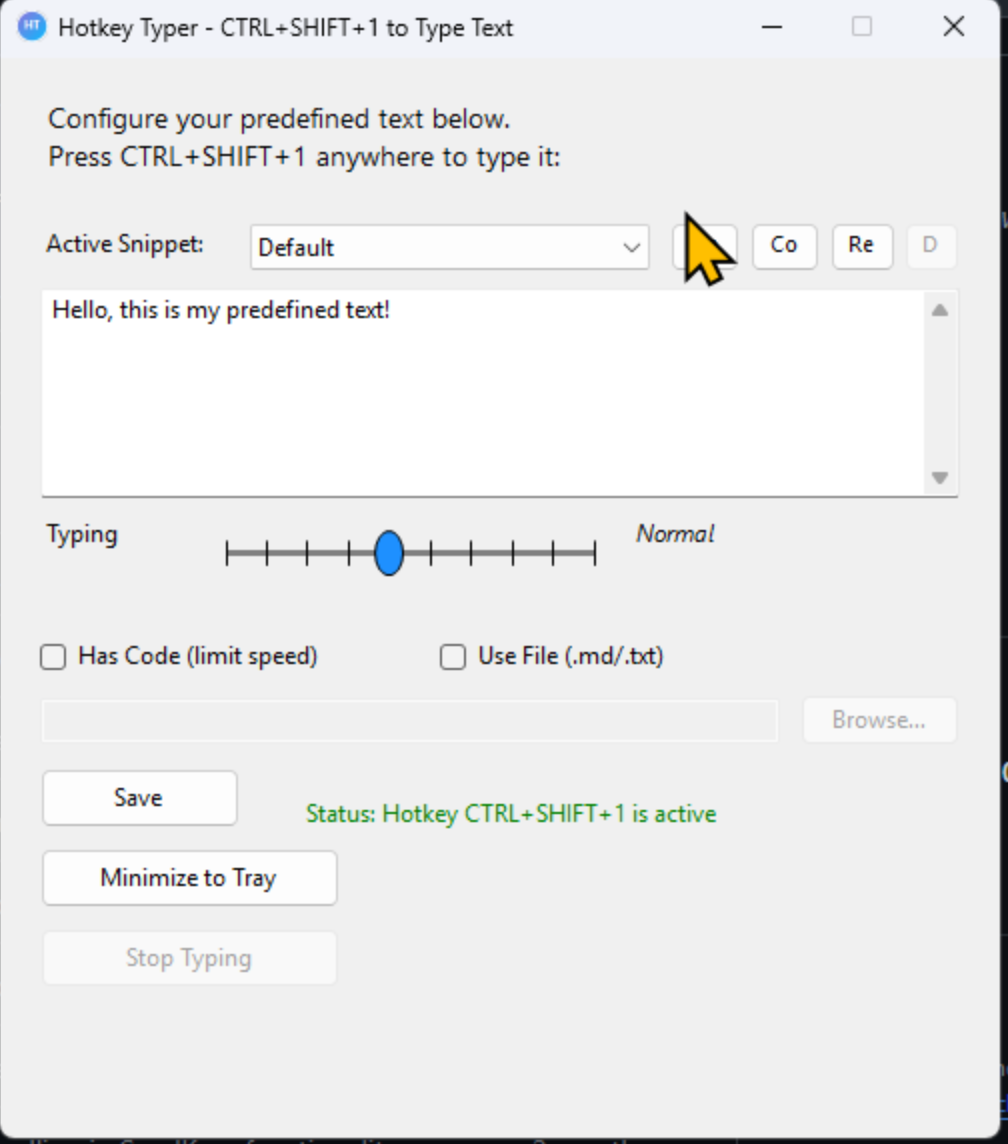
First Attempt: Without the Custom Agent (PR #7)
I first assigned the standard Copilot coding agent to Issue #3, resulting in Pull Request #7. The implementation was functional:
- ✅ Data model created with
Snippetclass - ✅ CRUD operations implemented
- ✅ UI with ComboBox and management buttons
- ✅ Unit tests added
- ✅ Settings serialization worked
However, there were notable issues:
- Layout wasn't optimal for WinForms best practices
- Controls weren't properly anchored/docked for responsive resizing
- Missing some WinForms-specific patterns for dialog handling
- Code style didn't fully align with established WinForms conventions
- No consideration for DPI scaling or accessibility
While functional, it felt like code written by someone proficient in general C# but not deeply experienced with WinForms specifics.
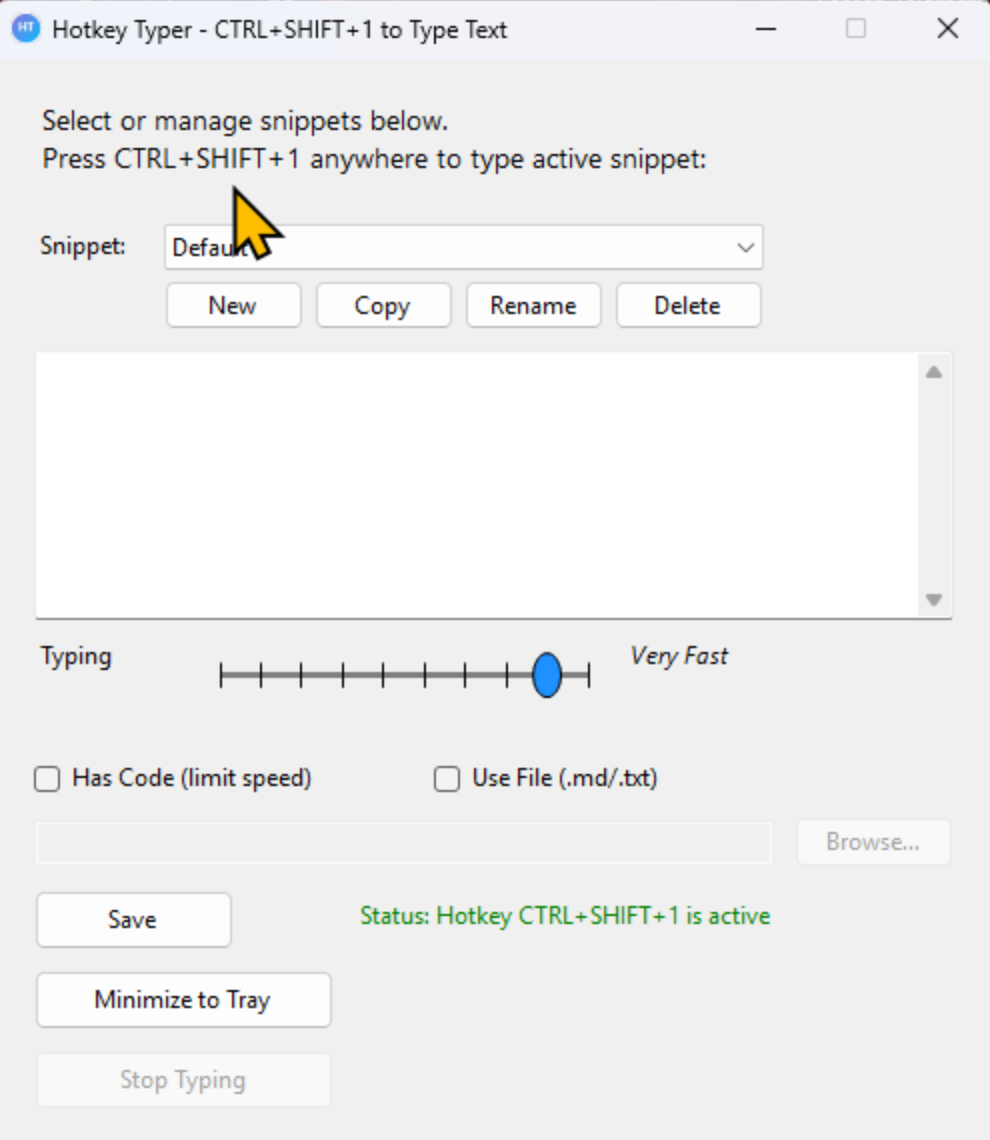
Second Attempt: With the WinForms Expert Agent (PR #8)
Then I closed PR #7 and reassigned Issue #3 to Copilot, but this time explicitly mentioning the WinForms Expert agent. The results in Pull Request #8 were dramatically better:
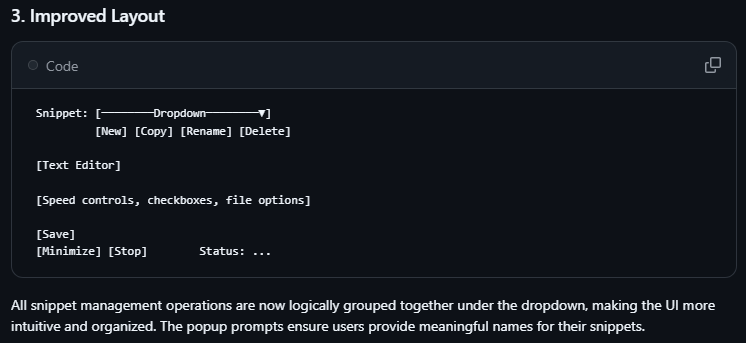
Improved UI Organization:
Snippet: [────────Dropdown (300px)────────▼]
         [New] [Copy] [Rename] [Delete]

[Text Editor (460x135)]

[Speed slider, checkboxes, file options]

[Save]
[Minimize] [Stop]        Status: Active
The agent reorganized the layout following WinForms best practices:
- Logical grouping of snippet management operations
- Proper spacing and margins (3px minimum)
- Controls properly anchored for responsive behavior
- Consideration for DPI scaling
Enhanced User Experience:
- Popup dialogs using
InputDialogfor New/Copy/Rename operations - Proper validation with meaningful error messages
- Case-insensitive duplicate detection
- Protection against deleting the last snippet
- Better visual feedback for operations
Code Quality Improvements:
- Modern C# 11-14 features in business logic
- Proper separation between designer code and regular code
- File-scoped namespaces
- Target-typed
newexpressions - Nullable reference types in appropriate contexts
- Exception handling with
ArgumentNullException.ThrowIfNull
Even Better Documentation:
The agent included detailed diagrams of the UI layout directly in the PR description, making the implementation immediately understandable.
Key Code Differences: Before and After
Let me show you some concrete examples of the improvements the WinForms Expert agent made:
1. InputDialog Helper Class
PR #7 (Without WinForms Expert): Used an inline dialog creation pattern with repetitive code in each button handler.
PR #8 (With WinForms Expert): Created a dedicated, reusable InputDialog class following WinForms best practices:
internal class InputDialog : Form
{
    private readonly TextBox txtInput;
    private readonly Button btnOK;
    private readonly Button btnCancel;

    public string InputText => txtInput.Text;

    public InputDialog(string prompt, string title, string defaultValue = "")
    {
        Text = title;
        FormBorderStyle = FormBorderStyle.FixedDialog;
        StartPosition = FormStartPosition.CenterParent;
        MaximizeBox = false;
        MinimizeBox = false;
        ClientSize = new Size(350, 120);

        // Control setup...

        // Select all text when dialog opens
        Load += (s, e) => txtInput.SelectAll();
    }

    public static string? Show(string prompt, string title, string defaultValue = "")
    {
        using var dialog = new InputDialog(prompt, title, defaultValue);
        return dialog.ShowDialog() == DialogResult.OK ? dialog.InputText : null;
    }
}
This is a textbook WinForms pattern: proper disposal with using, nullable return type, static factory method, and proper dialog configuration.
2. Settings Migration Pattern
PR #7 (Without WinForms Expert): Used a "fresh start" approach that ignored existing settings if loading failed.
PR #8 (With WinForms Expert): Implemented proper backward-compatible migration:
// Migration: Convert old single PredefinedText to snippet if no snippets exist
if (settings.Snippets == null || settings.Snippets.Count == 0)
{
    string contentToMigrate = !string.IsNullOrEmpty(settings.PredefinedText)
        ? settings.PredefinedText
        : DefaultSnippetContent;
    snippets = new List<TextSnippet>
    {
        new TextSnippet
        {
            Id = DefaultSnippetId,
            Name = DefaultSnippetName,
            Content = contentToMigrate,
            LastUsed = DateTime.Now
        }
    };
    activeSnippetId = DefaultSnippetId;
}
else
{
    snippets = settings.Snippets;
    activeSnippetId = settings.ActiveSnippetId;

    // Validate active snippet exists
    if (string.IsNullOrEmpty(activeSnippetId) ||
        !snippets.Any(s => s.Id == activeSnippetId))
    {
        activeSnippetId = snippets.FirstOrDefault()?.Id;
    }
}
This handles the upgrade path gracefully, preserving user data instead of discarding it.
3. UI Layout in Designer Code
PR #7 (Without WinForms Expert): Controls placed with absolute positioning and cramped spacing:
var btnNewSnippet = new Button
{
    Text = "New",
    Location = new Point(335, 82),
    Size = new Size(35, 25),  // Cramped button
    Font = new Font("Segoe UI", 8F)
};
PR #8 (With WinForms Expert): Better organized with logical grouping and proper sizing:
// Snippet selector ComboBox - wider, more prominent
var cmbSnippets = new ComboBox
{
    Name = "cmbSnippets",
    Location = new Point(85, 82),
    Size = new Size(300, 23),  // 300px width for readability
    DropDownStyle = ComboBoxStyle.DropDownList,
    Font = new Font("Segoe UI", 9F)
};

// Snippet management buttons - moved under dropdown for logical grouping
var btnNewSnippet = new Button
{
    Name = "btnNewSnippet",
    Text = "New",
    Location = new Point(85, 110),
    Size = new Size(70, 25),  // Proper button size
    Font = new Font("Segoe UI", 9F)
};
The WinForms Expert agent understood that:
- ComboBoxes should be wide enough to display meaningful names
- Related buttons should be grouped together visually
- Font size 8F is too small for modern displays
- Controls need descriptive names for maintainability
4. Validation Logic with User Feedback
PR #7: Basic validation without proper user feedback:
if (string.IsNullOrWhiteSpace(name)) return;
if (snippets.Any(s => s.Name.Equals(name, StringComparison.OrdinalIgnoreCase)))
{
    MessageBox.Show("A snippet with this name already exists.",
        "Duplicate Name", MessageBoxButtons.OK, MessageBoxIcon.Warning);
    return;
}
PR #8: Enhanced validation with trim and separate empty-string check:
// Validate: trim and check uniqueness (case-insensitive)
name = name.Trim();
if (string.IsNullOrEmpty(name))
{
    MessageBox.Show("Snippet name cannot be empty.",
        "Invalid Name", MessageBoxButtons.OK, MessageBoxIcon.Warning);
    return;
}

if (snippets.Any(s => string.Equals(s.Name, name, StringComparison.OrdinalIgnoreCase)))
{
    MessageBox.Show("A snippet with this name already exists.",
        "Duplicate Name", MessageBoxButtons.OK, MessageBoxIcon.Warning);
    return;
}
The WinForms Expert understood the importance of:
- Trimming user input (common WinForms pattern)
- Providing specific error messages for different failure modes
- Using
string.Equalsfor clarity over extension method
5. Modern C# Features in Business Logic
PR #8 consistently used modern C# patterns throughout:
// File-scoped namespace
namespace HotkeyTyper;

// Target-typed new
private List<TextSnippet> snippets = new();

// Expression-bodied member
public string InputText => txtInput.Text;

// Nullable reference types
public static string? Show(string prompt, string title, string defaultValue = "")

// Using declaration (proper disposal)
using var dialog = new InputDialog(prompt, title, defaultValue);
While PR #7 had some modern features, PR #8 applied them consistently and appropriately.
6. Comprehensive Unit Tests
PR #8 included thorough migration tests that PR #7 lacked:
[Fact]
public void OldSettings_MigratesToSnippets()
{
    // Arrange - Old settings format with single PredefinedText
    string oldSettingsJson = """
    {
        "PredefinedText": "Hello, World!",
        "TypingSpeed": 7,
        "HasCode": true
    }
    """;

    var oldSettings = JsonSerializer.Deserialize<AppSettings>(oldSettingsJson);

    // Act & Assert - Settings should be migrated
    Assert.NotNull(oldSettings);
    Assert.Null(oldSettings.Snippets);
    Assert.Equal("Hello, World!", oldSettings.PredefinedText);
}
These tests ensure the backward compatibility works correctly—a crucial detail for production applications.
The Visible Difference
The before-and-after images tell the story:
Without WinForms Expert:
- Basic layout, functional but not polished
- Controls not optimally positioned
- Missing WinForms-specific refinements
With WinForms Expert:
- Clean, logical organization
- Professional spacing and alignment
- Proper control grouping
- Responsive layout that scales correctly
The agent even provided visual diagrams showing the layout structure, demonstrating deep understanding of WinForms design patterns.
The Impact: Quality and Velocity
The difference between PR #7 and PR #8 wasn't just cosmetic. The WinForms Expert agent delivered:
Better Architecture:
- Proper use of
BindingSourcepatterns for data binding - Correct designer code serialization patterns
- Appropriate use of modern C# features in the right contexts
- Following established WinForms conventions consistently
Fewer Iterations:
- PR #7 required multiple rounds of feedback and corrections
- PR #8 was nearly perfect on the first attempt
- Code reviews focused on business logic, not framework usage
Knowledge Transfer:
- Seeing the agent's implementation taught me WinForms patterns I hadn't fully mastered
- Comments in the code explained why certain approaches were used
- The detailed PR descriptions served as documentation
Time Savings:
- What would have taken days of iteration took hours
- Less time debugging designer code issues
- More time focusing on features, not framework quirks
Getting Started with Custom Agents
Ready to try custom agents in your projects? Here's how:
1. Explore the Awesome-Copilot Repository
Visit github.com/github/awesome-copilot and browse the available agents.
2. Add an Agent to Your Repository
- Create
.github/agents/in your repository - Copy the agent
.mdfile from awesome-copilot - Customize if needed (optional)
- Commit and push
3. Use the Agent
In GitHub issues, pull requests, or VS Code:
- Mention the agent by name in your request
- For issues: Assign Copilot and reference the agent
- For VS Code: Use
<agent-name>in chat from agent drop down

4. Create Your Own Agents
Have specific team conventions? Create custom agents that encode:
- Your coding standards
- Framework-specific patterns
- Architecture preferences
- Testing strategies
- Documentation requirements
Full documentation: GitHub Docs - Creating Custom Agents
Key Takeaways
Working with the WinForms Expert agent taught me several valuable lessons:
Specialization Matters: Generic AI coding assistance is good, but specialized agents that understand framework-specific patterns are transformative. The depth of knowledge in the WinForms Expert agent far exceeded what I could convey in ad-hoc prompts.
Consistency Across the Team: Custom agents ensure everyone on your team follows the same patterns and best practices, even for developers less familiar with specific frameworks.
Living Documentation: Agent profiles serve as executable documentation of your team's coding standards—they don't just describe patterns, they enforce them.
Knowledge Amplification: Using specialized agents is a learning experience. Seeing high-quality, pattern-consistent code generated repeatedly helps developers internalize best practices.
Velocity Without Sacrificing Quality: The right custom agent doesn't just generate code faster—it generates better code faster, reducing technical debt and future maintenance burden.
Wrapping Up
The difference between PR #7 (without custom agent) and PR #8 (with WinForms Expert) perfectly illustrates why custom agents represent a significant leap forward in AI-assisted development. It's not about replacing developer expertise—it's about amplifying it with domain-specific knowledge that would otherwise require years of experience to accumulate.
For Hotkey Typer, the WinForms Expert agent helped deliver a feature that not only works but follows industry best practices, is maintainable, accessible, and properly architected for future enhancements. The implementation handles edge cases, uses appropriate design patterns, and would pass a senior code review with minimal comments.
If you're working with WinForms—or any specialized framework—I highly recommend exploring custom agents. The awesome-copilot repository is an excellent starting point, and creating your own team-specific agents is easier than you might think.
Learn More
- Hotkey Typer Repository: github.com/jamesmontemagno/app-hotkeytyper
- Issue #3 - Multiple Snippets Feature: Issue #3
- PR #7 - Without WinForms Expert: Pull Request #7
- PR #8 - With WinForms Expert: Pull Request #8
- Awesome Copilot Agents: github.com/github/awesome-copilot
- Custom Agents Documentation: docs.github.com/en/copilot/concepts/agents/coding-agent/about-custom-agents
Custom agents aren't just the future of AI-assisted development—they're available today, and they're already making a significant difference in how we build software. Give them a try, and see the difference specialized expertise can make in your projects!
Have you tried custom agents in your projects? I'd love to hear about your experiences. Share your thoughts and questions on X!
This blog was written with VS Code and Claude Sonnet 4.5 based on a very lovely prompt with images, MCP server access, and more written by ME! I also reviewed and slightly modified the blog.