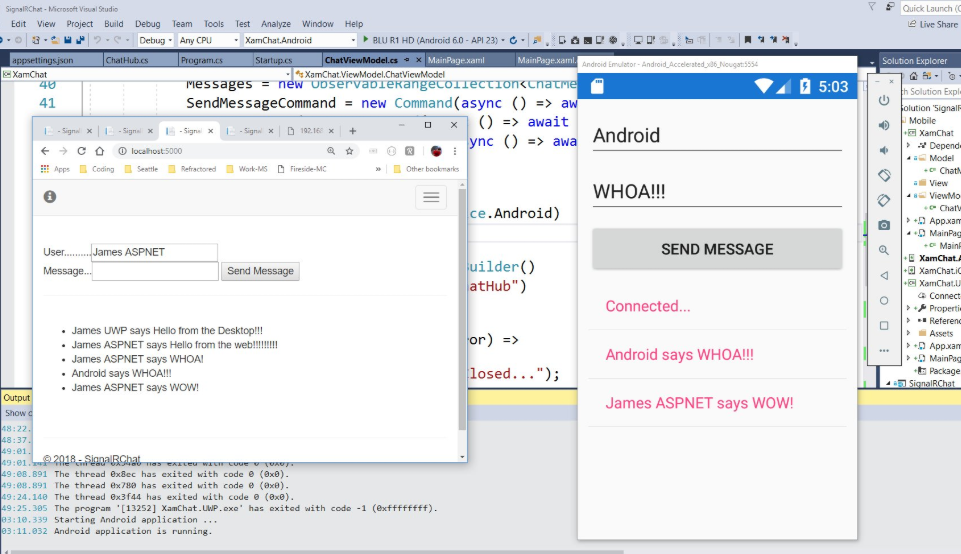
Real Time Communication or RTC as the cool kids call it has always been a hot topic, especially for mobile. In normal mobile development when we wanted to get updates of data we would make a web request to a server, pull down data, and update our user interface. If you wanted to get bits of data on demand and in real time you would have to integrate WebSockets or some sort of push notifications to receive data as it is happening. However, it doesn't have to be anymore with the latest version of SignalR (ASP.NET Core SignalR) which is fully compatible with .NET Standard 2.0 for ASP.NET, UWP, WPF, WinForms, and Xamarin!

I have been pretty obsessed with trying to learn SignalR so I started doing a weekly Twitch Stream every Saturday where I am building an app with it. You can find the latest streams on YouTube where I build the server backend and then integrate into a mobile app. In this blog I will walk you through the basics to do it all locally only on your machine.
Why SignalR (Core)
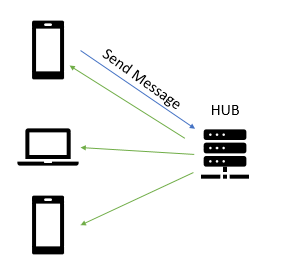
SignalR has been around for a long time and yes technically did work with Xamarin after a bunch of work. Now, with ASP.NET Core SignalR as they call it, everything has been simplified into a few simple packages for your backend server and client apps. At the center of SignalR is a "Hub" that handles incoming and outgoing messages. A client sends a message to the Hub and the Hub distributes the message to all clients that are connected:
SignalR handles all of the complex stuff for you:
- Handles connection management automatically.
- Sends messages to all connected clients simultaneously. For example, a chat room.
- Sends messages to specific clients or groups of clients.
- Scales to handle increasing traffic.
- Supports WebSocketss, Server-Sent Events, & Long Polling and figures out which to use automatically.
Here is the introduction documentation to browse through.
Hub Backend
The code is extremely simple for the ASP.NET Core backend web application. The SignalR server library is already part of an ASP.NET Core app, so there isn't anything for the Hub besides writing a few lines of code:
using Microsoft.AspNetCore.SignalR;
using System;
using System.Threading.Tasks;

namespace SignalRChat.Hubs
{
    public class ChatHub : Hub
    {
        public async Task SendMessage(string user, string message)
        {
            await Clients.All.SendAsync("ReceiveMessage", user, message);
        }
    }
}
This code handles all messages that are sent to the "SendMessage", which when received by the Hub will send a message with the key "ReceiveMessage" to everyone connected.
Besides this Hub code we will need to configure the service and route in the Startup.cs file.
In ConfigureServices add the following code at the end of the method:
services.AddSignalR();
Then in Configure we will want to add a route for the Hub that our clients will connect to (right before UseMvc):
app.UseSignalR(routes =>
{
    routes.MapHub<ChatHub>("/chatHub");
});
A few important notes here. If you are developing on localhost you may want to disable UseHttpsRedirection until you publish to Azure. This will ensure the mobile apps can communicate on the local machine. Also if you want to integrate a web client there is a javascript/typescript library that you can use.
Client NuGet
For our mobile .NET client we simply need to install the Microsoft.AspNetCore.SignalR.Client into our iOS, Android, UWP, and .NET Standard projects and we are ready to code!
Connecting to the Hub
Everything revolves around a HubConnection, which can be found by bringing in the SignalR namespace:
using Microsoft.AspNetCore.SignalR.Client;
After that we are able to create our local instance and connect to it. We are going to connect directly to localhost since I ran it on my local machine, but you can swap out the IP if you published your backend to Azure:
HubConnection hubConnection;
public ChatViewModel()
{
    // localhost for UWP/iOS or special IP for Android
    var ip = "localhost";
    if (Device.RuntimePlatform == Device.Android)
        ip = "10.0.2.2";

    hubConnection = new HubConnectionBuilder()
        .WithUrl($"http://{ip}:5000/chatHub")
        .Build();
}
Now, all we need to do is connect to the hub. This should be done only when you need the real time connection and you should disconnect when you don't need it or when your application goes into the background:
async Task Connect()
{
    try
    {
        await hubConnection.StartAsync();
    }
    catch (Exception ex)
    {
        // Something has gone wrong
    }
}
Once connected we can start to send and receive messages.
Sending Messages
This code could not be any easier by using the InvokeAsync method on our connection:
async Task SendMessage(string user, string message)
{
    try
    {
        await hubConnection.InvokeAsync("SendMessage", user, message);
    }
    catch (Exception ex)
    {
        // send failed
    }
}
Notice here we are sending a strongly typed key to our backend, which matches the name of the method in our Hub. SignalR figures out how to invoke this method automatically.
Important note here is that there is also a SendAsync method which is what you first think that you want to use. As explained to me by Damian Edwards SendAsync is a fire and forget type of send and only ensures that the send happens from the connection and does not wait for a response at all. SendAsync is usually used by the server, whereas InvokeAsync actually ensures that the message was sent and that the server received the message.
Receiving Messages
This may be my favorite part of the API because it is really beautiful in its implemenation. You just register functions using the On method that passes in any type of arguments to a stringly typed key:
 hubConnection.On<string, string>("ReceiveMessage", (user, message) =>
{
    var finalMessage = $"{user} says {message}";
    // Update the UI
});
You don't even need to be connected to register these methods, which means you have a really clean seperation of the connection and handling of the messages.
That's it! The mobile app and server are done!!! If you want a full finished sample then I have you covered as everything that I have been doing on my stream can be found on my GitHub!
Considerations for Mobile
SignalR is the first step in helping developers create awesome applications for mobile with Real Time Communciation. There are a few considerations that you should think about when implementing this type of functionality.

Connect and Disconnect
Always ensure that you connect and disconnect when appropriate. When your application goes into the background or your users leave the page that it is on.
Backgrounding
Each platform has different limitations when an app goes into the background or is fully closed by the user. You should not depend on this at all and always have a good fallback for push notifications or different polling based on the state of your app.
Handle Disconnects and Reconnects
Use Xamarin.Essentials to help out with connection state of your device and make sure to fallback gracefully when there is no internet or spotty internet.


