
So last week I wrote about and showed off some custom Robot Fonts using my RobotoTextView which you can find on GitHub. However the great Stuart Lodge challenged me to make ti a bit more generic so it could be applied to any control that derives from TextView. This seemed like a cool idea and didn’t have the foggiest idea of how to do this. Stuart told me to go checkout the LayoutInflator.IFactory for a custom inflate. This seemed crazy, but whatever so I gave it ago.
What is IFactory?
From my reading it allows you to create a custom LayoutInflator to be used before SetContentView or inflating a view. It will allow you to replace any of the view with another view. THIS IS CRAZY! This means someone could actually tell you to create a TextView but you say NO you get a Button! Now of course you wouldn’t want to do this, but it does allow you to do one really cool thing, which is apply your own custom attributes.
So before you would have to create your own “RobotoTextView”, “RobotoButton”, etc for each type. However now you can simply add anything that derives from TextView such as a RadioButton, Switch, Button, CheckBox, and a bunch of others.
How it works:
- Add in your View: CheckBox for instance
- Add in the custom attribute: local:typeface=“roboto_thin”
- In your Activity/Fragment before you call “SetContentView” simply set a new factory to your LayoutInflator:
protected override void OnCreate(Bundle bundle)
{
  base.OnCreate(bundle);
  LayoutInflater.Factory = new RobotoTextFactory();
  // Set our view from the "main" layout resource
  this.SetContentView(Resource.Layout.Main);
}
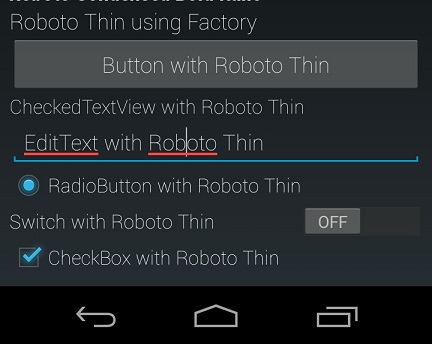
Doing so will allow you to get something like this:
You can go either route. I have heard that using a custom factory might take longer to load your views, but I have not done any studies on this yet.
How it works:
LayoutInflater.IFactory has 1 method to implement in it:
public View OnCreateView(string name, Context context, IAttributeSet attrs)
In here you can see if your custom attribute exists:
var attributeValue = attrs.GetAttributeIntValue("http://schemas.android.com/apk/res-auto", "typeface", -1);
If it != -1 then typeface does exists and is from your res-auto which is pretty awesome and you can then create the view and set the font just like we did in the past. The tricky part here is that this method passes you the name of the object such as “TextView”, “Button”, etc but then you need to actually create the view. I go ahead and do a switch case on the name and see what is valid. If it is I will go ahead and put the correct Type in a dictionary to cache around. Then I will go ahead and create a new instance:
Activator.CreateInstance(m_TypeList[name], context, attrs) as TextView;
As long as this is not null you can then set the typeface just like we did in the original. So there you have it. I have gone ahead and checked this in to my RobotoText project on Github!