
I have been recently experimenting with integrating ads into my applications as an experiment. Not really to make money, but to just get it setup and working. I recently experimented with both Facebook Ads and Google AdMob for my iOS app “Social Post” and the results have been pretty good. I discussed this strategy a few weeks back on the Merge Conflict podcast with Frank on Monitization.
Now, it is time to go a step further and add some ads into my Xamarin.Forms application Meetup Manager that has a lot of usage. I knew I had to update the app because of changes in Android N with SQLite, so I figure what better time. I was surprised how easy it was to actually get things setup and running.
Registring with AdMob
So, the first thing that you will need to do is actually register for AdMob. This will give you two important pieces of information, your “Application Code” and your “Ad Unit Id”. We will use these later, but simply go to: https://apps.admob.com, register for a new app, link to an app in Firebase, and you will be off running.
Downloading NuGet Package
This one is a bit tricky since Xamarin.Forms requires very specific package versions. Search for “Google Play Ads” and the Xamarin package should be the first one to come up. If you are using Xamarin.Forms.Maps then you should pick 29.0.0.1, else you can pick 29.0.0.2. (Note, that if you are targeting API 24+ you can install newer support libraries and then install 42.1021.1+ of the ads sdk :))

Custom Control
For my application I am not adding any custom data bindings or anything like that for the Ad Ids, so I just create a very very very simple custom control in my shared code:
using Xamarin.Forms;

namespace MeetupManager.Controls
{
    public class AdControlView : View
    {
    }
}
Ad View Renderer
Now, we have to go into our Android project and implement the custom control. Essentially just a method to create the native AdView and then set it when the page loads up.
using Android.Widget;
using Android.Gms.Ads;
using Xamarin.Forms;
using Xamarin.Forms.Platform.Android;

[assembly: ExportRenderer(typeof(MeetupManager.Controls.AdControlView), typeof(MeetupManager.Droid.PlatformSpecific.AdViewRenderer))]
namespace MeetupManager.Droid.PlatformSpecific
{
    public class AdViewRenderer : ViewRenderer<Controls.AdControlView, AdView>
    {
        string adUnitId = string.Empty;
        //Note you may want to adjust this, see further down.
        AdSize adSize = AdSize.SmartBanner;
        AdView adView;
        AdView CreateNativeAdControl()
        {
            if (adView != null)
                return adView;

            // This is a string in the Resources/values/strings.xml that I added or you can modify it here. This comes from admob and contains a / in it
            adUnitId = Forms.Context.Resources.GetString(Resource.String.banner_ad_unit_id);
            adView = new AdView(Forms.Context);
            adView.AdSize = adSize;
            adView.AdUnitId = adUnitId;

            var adParams = new LinearLayout.LayoutParams(LayoutParams.WrapContent, LayoutParams.WrapContent);

            adView.LayoutParameters = adParams;

            adView.LoadAd(new AdRequest
                            .Builder()
                            .Build());
            return adView;
        }

        protected override void OnElementChanged(ElementChangedEventArgs<Controls.AdControlView> e)
        {
            base.OnElementChanged(e);
            if(Control == null)
            {
                CreateNativeAdControl();
                SetNativeControl(adView);
            }
        }
    }
}
Update MainActivity
Go into your Main Activity and initialize your MobileAds from the SDK:
MobileAds.Initialize(ApplicationContext, "YOUR APP ID HERE FROM AdMob, has a ~ in it");
Update Manifest
You will now need to add 2 permissions:
<uses-permission android:name="android.permission.INTERNET"/>
<uses-permission android:name="android.permission.ACCESS_NETWORK_STATE"/>
Inside of the Application attribute you need to add this specific Activity for ads.
Update XAML
Now we can add the custom control to the bottom of your XAML.
First add your custom xmlns name space:
xmlns:controls="clr-namespace:MeetupManager.Controls;assembly=MeetupManager"
Then add in the custom control and boom done (you may need to set a HeightRequest="90" to have it show up!
Success!
You should now be able to run your app and boom! Test Ad!
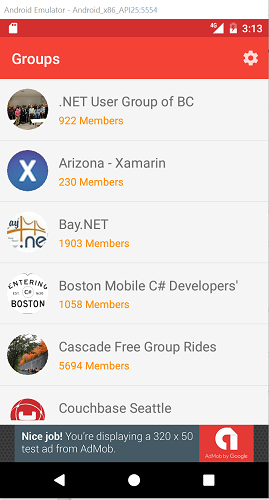
This of course was just a smart banner, but you could extend it even further and try out the other ads with custom renderers. Enjoy! Looking to add AdMob ads to iOS apps? I have you covered in my next blog found here.
Important
- A few things to know, since we are using a Smart Banner you can not have any padding around the adview it must fill the entire screen.
- You will see a test banner on the screen. If you don’t set the background color to red or something like this and if it isn’t rendering look at the output as it may not be able to connect or you have some padding.
- If you need padding then set it to just “Banner”