
When designing your app you have probably wondered about what type of navigation is the best to use. Dashboards, navigation lists, spinner drop downs, tabs, and fly out menus are all still prevalent and valid choices, however, Google has recently made a huge push to use their new standard Navigation Drawer control.
So what is a Navigation Drawer?
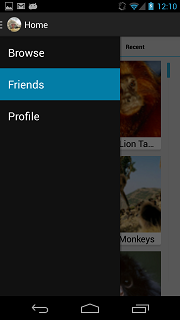
Similar to a flyout menu made famous by Facebook, the Navigation Drawer is designed to be swiped out from the left side of you application. The main difference is the navigation drawer slides on top of your main content and dims it out. This is unlike flyout which actually pushes your content off screen and is more jarring for your user.
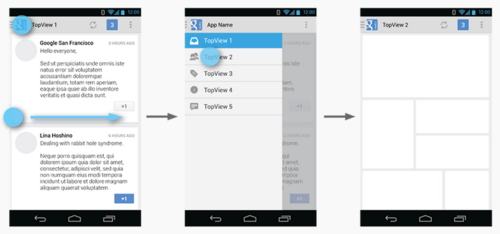
As you can see here, the user will slide or press the home button to slide out the navigation drawer, and then select which section they would like to go to next.
Why Navigation Drawer?
1.) Now a standard control in the Support v4 library and ties directly into the Action Bar.
2.) Easy to implement with a Fragment first approach.
3.) Highly customizable. Use for navigation, account selection, or a combination of both. The possibilities are endless really.
4.) User familiarity as Google and others have already upgraded nearly all of their applications to follow this navigation scheme.
Let’s Code!
So enough background on the Navigation Drawer. Let’s write some code in Xamarin.Android!
When designing for the Navigation Drawer, you should first think of your apps flow. The navigation drawer is part of your main activity and is a container for all other sections, which are fragments that are swapped in and out. In this example I have the following:
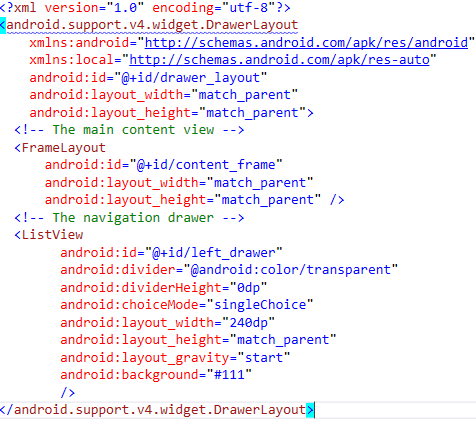
Create your Drawer Layout:
This is the standard layout that Google recommends, which is a “DrawerLayout” as the root object with a “FrameLayout” to contain your main content or fragments that you will swap in and out. After that, you then have a “ListView” which is your actual Navigation Drawer. In this example we will just use a standard list, but you could completely customize it with headers, footers, or change it to something completely different.
Initialize the Drawer List
In this sample, I am simply creating an array of sections that my application might have, however you can customize your ListView to have a custom adapter that will display images or other information.
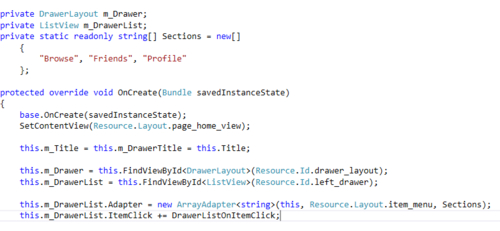
The last thing I am doing here is registering for an ItemClick event on my ListView to detect when the user selects a section.
Handle Navigation Click Events
Since we have registered for an ItemClick event “DrawerListOnItemClick” we will implement this method to replace the Resource.Id.content_frame with the fragment that the user has selected based on the position.
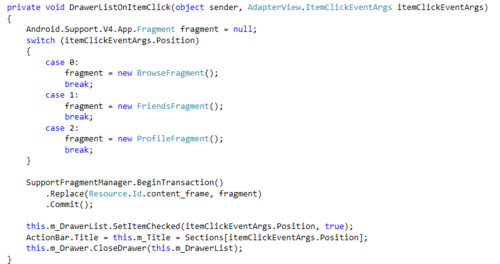
In this example I am using the SupportFragmentManager because I am going to be using a ViewPagerIndicator which takes Support v4 Fragments. However, if you are not using this you are free to use the standard FragmentManager. After I replace and commit the fragment, the last things to do are to set the correct checked position in the ListView, update the ActionBar with the title of the current fragments, and most importantly, close the drawer.
Listen for Drawer Events with ActionBarDrawerToggle
Each DrawLayout has a DrawerListener which is an ActionBarDrawerToggle that is used to notify us when the Drawer is opened, closed, state changed, or had slid open. In the sample you will find a class called “MyActionBarDrawerToggle.cs,” which implements all of the proper methods.
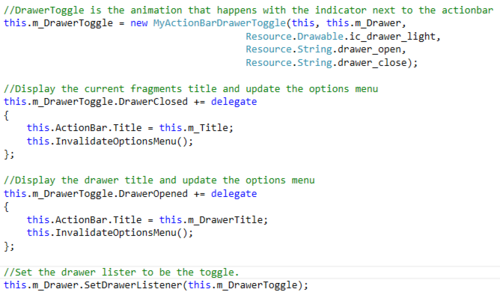
You will want to create a new “MyActionBarDrawerToggle” in your OnCreate, which takes in the current Activity, the icon to use, and a few strings to display if the user long presses on the toggle. After you have created the new Toggle you will want to implement the DrawerOpen and DrawerClosed events to update the ActionBar title and to also update the OptionsMenu. Finally you need to set the DrawerListener for your Drawer to actually listen for these events.
The standard drawer icons can be downloaded from Google.
Wrapping it up:
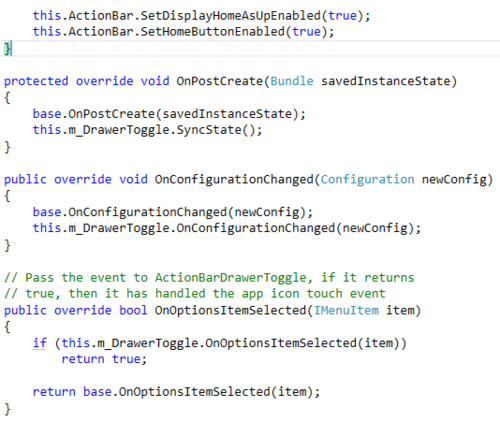
The other last few steps allow the user to open and close the navigation drawer by touching the app icon in the ActionBar. Simply set the SetDisplayHomeAsUpEnabled and SetHomeButtonEnabled in your OnCreate and then ensure that you synchronize your DrawerToggle throughout the main activities lifecycle.
Compatibility:
The navigation drawer ties directly into ActionBar, so if you are looking to target older platforms look into using ActionBarSherlock or the new ActionBarCompat(support v7) libraries. Full MvvmCross support is also available with a little adjustment by using a CustomPresenter to intercept navigation to present the fragments. A full example is available on GitHub.
Fragments inside of fragments!
Everything inside of the navigation drawer is a fragment, so that can lead to some interesting scenarios if you are using something like a ViewPagerIndicator, which also consists of fragments. Do not fear as you can use nested fragments! Simply provide the ChildFragmentManager instead of the standard FragmentManager and this will cover you!
Design Consideration:
Override OnPrepareOptionsMenu and remove any action items that are related to the content view. It is best practice to only show action items that pertain to the Navigation Drawer when it is open.
After the user first installs your application you might want to open the Navigation Drawer when they first load your application. This will allow your users to become familiar with the different sections of your application.
There you have it! A beautiful navigation model for your application. Check out full sample code available on GitHub.

Update! I presented on Navigation at Xamarin Evolve 2014: